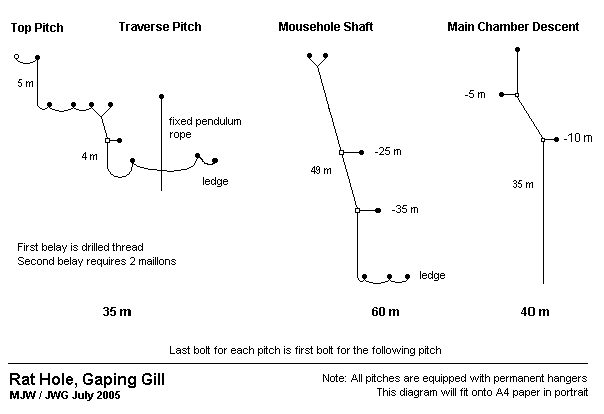
Printed from: http://braemoor.co.uk/caving/rathole1.shtml
Copyright: © 1998 - 2024 John Gardner

Photograph of the volcano formation in Witches II Cave

Rathole - A Rigging Guide

Back to the index of articles

This series of articles is intended for the guidance of experienced cavers, who may not be familiar with the details of the best routes through the more complex systems in the Yorkshire Dales. To echo the sentiments in Northern Caves, it "is intended as guidance for the wise, not the obedience of fools"

Rathole rigging  guide Drilled flake high in left hand wall Single P-bolt on far side of pitch requiring two maillons Two traverse P-bolts in right hand wall Y-hang from two P-bolts on right side of rift Deviation in the south wall at about -2m with 50cm sling in place P-bolt in right hand wall of narrow part of rift at -4m . Ample footholes. 3.5m pendulum swing onto a ledge system using a fixed rope Traverse / security P-bolt above ledge in north wall First Y-hang P-bolt for Mousehole Shaft in north wall Y-hang  from P-bolts above and to the east of the ledge Deviation in the south wall at -25m with 50cm sling in place Deviation in the south wall at -35m with 75cm sling in place Bottom belay to P-bolt in south wall at head height Traverse P-bolt in south wall along rift to the east P-bolt in south wall for the last pitch P-bolt in south wall for the last pitch Deviation in the north wall at -5m with 85cm sling in place Deviation in the south wall at -10m below rock bridge. 60cm sling in place 35m of rope required up to Y-hang for Mousehole Shaft 60m of rope required from Mousehole Y-hang to top of last pitch 40m of rope required from top belay to floor of Main Chamber Mousehole Shaft - 49m deep, requiring 60m rope Pitch into Main Chamber - 35m deep, requiring 40m rope Top Pitch - 5m deep rigged with Traverse Pitch requiring 35m rope in total Traverse Pitch from Rathole Shaft to Mousehole Shaft - 4m deep requiring 35m of rope rigged with Top Pitch Rathole rigging guide

Pitch 1 - Rat Hole

Approaching the short first pitch, there is an inconspicuous drilled thread high up on the left. An unused bolt in the roof is followed by a single bolt hang on the far wall of the pot which requires 2 maillons.

Pitch 2 - Traverse Pitch

From the base of the first pitch, a rift leads past two traverse bolts on the right wall, to overlook the Rat Hole waterfall. Here good footholds allow a Y-hang on the right to be rigged. Then, almost immediately, a deviation on the left and a short descent means one can swing east away from the water. This gains the narrowest part of a bottomless rift, where there are footholds and a bolt in the south wall. Heading on into the rift, it is easiest to clip the chest jammer onto the fixed pendulum rope and swing across to a good ledge with bolt. This dry ledge has room for a couple of people, and a metre or so further, on the north wall, is the Y-hang for Mousehole Shaft.

Pitch 3 - Mousehole Shaft

The next section descends Mousehole Shaft to The Amphitheatre (or 'Wet Ledge') where some spray will be met. There are deviations on the south wall at 25 m and 35 m (ignore the one at -10 m). Once in The Amphitheatre, there is a bolt for a bottom belay at eye level on the south wall. Turning left under a big chockstone, a short traverse on good footholds leads past one bolt on the right to a second, which is the belay for the last pitch. There is room for a number of people in this area, but it is a bit damp for comfort.

Pitch 4 - Main Chamber

The final pitch drops past a deviation on the north wall at 5 m, to land on a rock bridge. A deviation on the south wall then allows a clean drop to the floor of Main Chamber, where some spray will be met.

Tackle Required

Rope: 35 m, 60 m, 40 m.
Maillons: 13
Karabiners: 5 (for deviations)
Deviation slings should be in place.

Note: This route was bolted as part of the CNCC Technical Group bolting programme.